Showing posts with label photoshop. Show all posts
Thursday, May 13, 2010
Thursday, March 4, 2010
Actions! My very 1st truly photoshop creations!
OH my oh my oh my!!!!
i did it! ALL THANKS TO pioneer woman's action set that she has updated here! it is sooooo sooo cool! all i did was to follow her instructions and double click... voila! since i was working on this photo, i though i will use the actions to tweak this and here is the before and after!
before
oh boy do i really love this effect! i used the action set: Seventies + Warmer + Sharpen. and there you have it! download it from her website. no photo will ever be the same again! :D
here's a little tip for those of you like me who's a little photoshop nerd :) i didn't really know how to use the actions until i read again the instructions. one little button makes the whole of difference. makes everything possible with just one click :D
here's a print screen of the step by step instructions on how to have your actions at a click. i had some trouble looking for the drop down menu. but once i found it. it's easy peasy from there after.
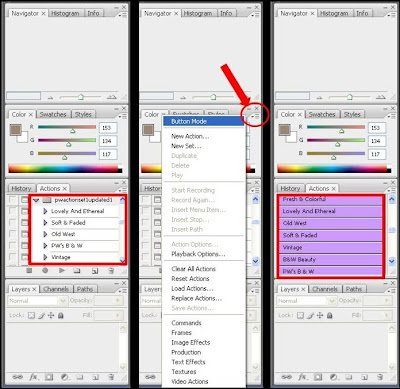
once you get this done, you just have to click on any actions in purple (some in other colours). you can combine a few of the actions to get an amazing effect. the thing is just go have fun! in any case, just click 'start all over' and you can do it all over again! it's that easy!
here's a cool visual reference to the options you get when you download the pioneer woman's action set. she really ROCKS!
i did it! ALL THANKS TO pioneer woman's action set that she has updated here! it is sooooo sooo cool! all i did was to follow her instructions and double click... voila! since i was working on this photo, i though i will use the actions to tweak this and here is the before and after!
before
here's a little tip for those of you like me who's a little photoshop nerd :) i didn't really know how to use the actions until i read again the instructions. one little button makes the whole of difference. makes everything possible with just one click :D
here's a print screen of the step by step instructions on how to have your actions at a click. i had some trouble looking for the drop down menu. but once i found it. it's easy peasy from there after.
once you get this done, you just have to click on any actions in purple (some in other colours). you can combine a few of the actions to get an amazing effect. the thing is just go have fun! in any case, just click 'start all over' and you can do it all over again! it's that easy!here's a cool visual reference to the options you get when you download the pioneer woman's action set. she really ROCKS!
Wednesday, February 24, 2010
after 2 hours - my 1st PS attempt at layering
Finally... from this.....
to this... after 5 layers? i still dunno how to navigate through PS. such a maze. but it's a good attempt for self taught fellow. i followed this from coffeeshop and tweaked a little...

instructions:-
1. Color Fade Layer: Add a gradient map adjustment layer, black to white. This turns your image B&W. Adjust the opacity to fade the color but not completely remove it. For the image above it was set to 40%.
2. Purple Color Fill Layer: Add a color fill adjustment layer and put #4d1c5d in the bottom space. Put this layer in Screen blending mode and adjust opacity to taste (I used 100%).
3. Yellow Color Fill Layer: Add a color fill adjustment layer and put #faec0a in the bottom space. Put this layer in Color blending mode and adjust opacity to taste (I used 15%).
4. Ivory Color Fill Layer: Add a color fill adjustment layer and put #fdfceb in the bottom space. Put this layer in Normal blending mode and adjust opacity to taste (I used 10%).
5. Bright Blue Color Fill Layer: Add a color fill adjustment layer and put #0f1977 in the bottom space. Put this layer in Exclusion blending mode and adjust opacity to taste (I used 25%).

instructions:-
1. Color Fade Layer: Add a gradient map adjustment layer, black to white. This turns your image B&W. Adjust the opacity to fade the color but not completely remove it. For the image above it was set to 40%.
2. Purple Color Fill Layer: Add a color fill adjustment layer and put #4d1c5d in the bottom space. Put this layer in Screen blending mode and adjust opacity to taste (I used 100%).
3. Yellow Color Fill Layer: Add a color fill adjustment layer and put #faec0a in the bottom space. Put this layer in Color blending mode and adjust opacity to taste (I used 15%).
4. Ivory Color Fill Layer: Add a color fill adjustment layer and put #fdfceb in the bottom space. Put this layer in Normal blending mode and adjust opacity to taste (I used 10%).
5. Bright Blue Color Fill Layer: Add a color fill adjustment layer and put #0f1977 in the bottom space. Put this layer in Exclusion blending mode and adjust opacity to taste (I used 25%).
can someone enlighten me on this?
how do i get from this

to looking like this?
based on what i saw from this flickr, apparently photoshop lightroom was used. that sound really high brow. can we do this with photoshop? how?
to looking like this?
based on what i saw from this flickr, apparently photoshop lightroom was used. that sound really high brow. can we do this with photoshop? how?
Tuesday, July 14, 2009
photoshop - tutorials

it's been ages since i wanted to start to play around with photoshop. this software is amazing. i have seen countless of crafters using it to make awesome stuff. recently i managed to get a hand on a copy of photoshop cs3. (the photo above of cs4 is only a dream for now :)) my only issue is the registeration online which i am stil trying to figure out. keeping my fingers cross that something brilliant will pop up along the way that will miraculously allow me to use this software. without the software i can know all the tricks and it will do me no good.
well, got this link which have tutorials on photoshop. hopefully this will help in future when i actually have a chance to hands on! one of the first thing i will do is - POLAROIDS!


photo source: liz kartncher
Subscribe to:
Posts (Atom)

.jpg)


+copy.jpg)